How to Download Google-services.json File Again
Secure your firebase'due south google-services.json file in android

Nowadays firebase is commonly used in android projects as information technology provides a quick solution for logging crashes, providing a database for storing app'south data, and for many other things also. The nearly unremarkably used mode for implementing the firebase in the android app includes downloading the google-services.json file from the firebase console and placing information technology in our project's app directory. This file is responsible for auto initializing the firebase on app startup.
But exercise yous know that this file contains some important keys and URLs that should not be leaked equally it may tamper with the security of your app? Also, have you ever wondered how easy is information technology to go those keys and URLs from your app with the assist of contrary applied science?
If you decompile your apk using some opposite applied science tools like Apktool, then you lot will detect that those keys are present in your app's strings.xml file as you tin come across below —

And it can be extracted by anyone and may tamper with the security of your app.
How do keys and URLs become stored in strings.xml?
So, what happens basically is, firebase will put these keys from the google-services.json file in the strings.xml file at compile time and utilize these at the fourth dimension of auto initializing.
So, is it possible to end this so that these keys and URLs cannot be retrieved from our app which can help in reducing the chances of tampering with the app?
And the answer is Yep.

How can this exist washed?
The first stride is to go the required keys from the google-services.json file as specified below and shop them in your app. You can check out my previous article to know how to securely shop hugger-mugger keys in android.
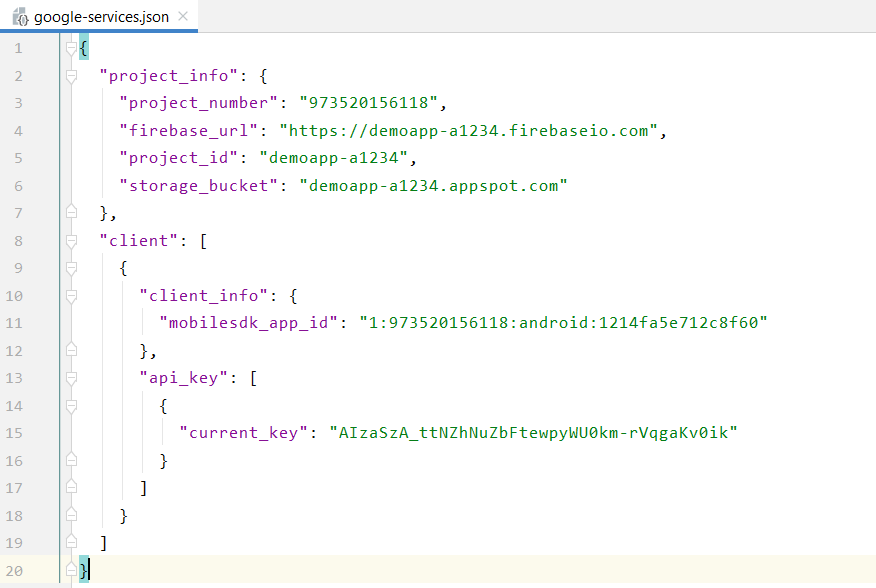
After storing these keys in your app, you lot can delete the google-services.json file from your app. Also, if you have added the below line in your app-level build.gradle file, then you have to remove this.
employ plugin: 'com.google.gms.google-services' Now you desire to disable auto initialization of firebase by adding the below code to manifest file —
          <provider
            android:name="com.google.firebase.provider.FirebaseInitProvider"
            android:regime="${applicationId}.firebaseinitprovider"
            tools:node="remove"
            />
At present the concluding footstep is to manually initialize the firebase past placing the respective keys that you have previously gotten from the google-services.json file —
Note — If you have added firebase crashlytics in your project, then you have to add together the following code in your app-level 'build.gradle' file to prevent the automated uploading of mapping file to firebase crashlytics at release time:-
android {
//...
buildTypes {
release {
//...
firebaseCrashlytics {
mappingFileUploadEnabled false
}
}
}
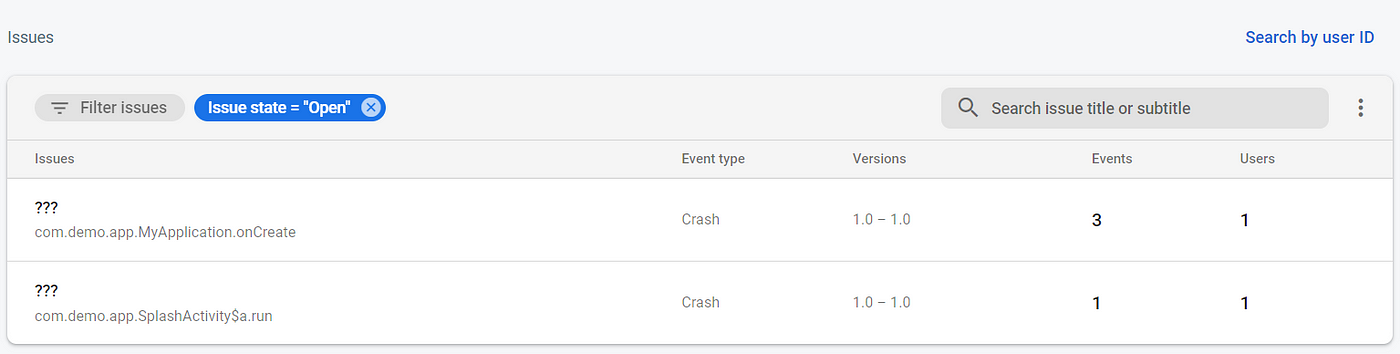
} But after preventing the automatic upload of the mapping file, your info will not exist preserved and you will no longer see a particular line number and the activity name where the crash occurs as you can encounter in the below screenshot —
But don't worry, in order to preserve the info and get the proper crash reports, you have to add together the following lawmaking to your app's proguard-rules.pro file —
Update — xiii/02/2022
If y'all are getting obfuscated crash reports in firebase crashlytics, then you lot might need to upload a mapping file to firebase manually later on generating the apk. But since firebase has not provided any official documentation for this, we are gonna employ android studio to customize the gradle task of uploading the mapping file so that this tin can be achieved.
But before starting, permit's see what happens in the background when you generate an apk —
So, basically, when you generate an apk, then firebase crashlytics generates an UUID with the help of injectCrashlyticsMappingFileId gradle task and associate that to the app. Afterwards that uploadCrashlyticsMappingFile gradle task is executed which uploads the mapping file to the firebase for that specific UUID. So ultimately, when a crash occurs in the specific apk, then firebase will check the mapping file belonging to the crashlytics UUID present in the apk, to deobfuscate the crash report.

STEP — 1
Y'all need to set the mappingFileUploadEnabled to true again in your app-level 'build.gradle' if you have set this to false before. This will ensure us that a 32 digit UUID is generated every time we generate an apk.
          android            {
                        //...
            buildTypes            {
            release            {
                        //...
                                      firebaseCrashlytics {
                mappingFileUploadEnabled truthful
                }
              }
              }
}
Step — 2
Yous need to restrict the execution of the uploadCrashlyticsMappingFileRelease task by calculation the following code at the bottom of your project-level build.gradle —
Note — Task name may vary depending upon the build season for which you are going to generate the apk. For instance — If you are having a build variant 'uat', then the proper noun of the task will exist uploadCrashlyticsMappingFileUatRelease.
STEP — 3
Generate the apk for the build variant that you want. After successfully creating the apk, a 32 digit UUID and mapping file will be generated that will be used in manual uploading of the mapping file.
STEP — 4
At present you need to replace the lawmaking that yous have added in your project-level build.gradle from the code as shown below. Also, note that syntax may vary depending upon the gradle version that you are going to apply. I take used gradle version 7.2 for this.
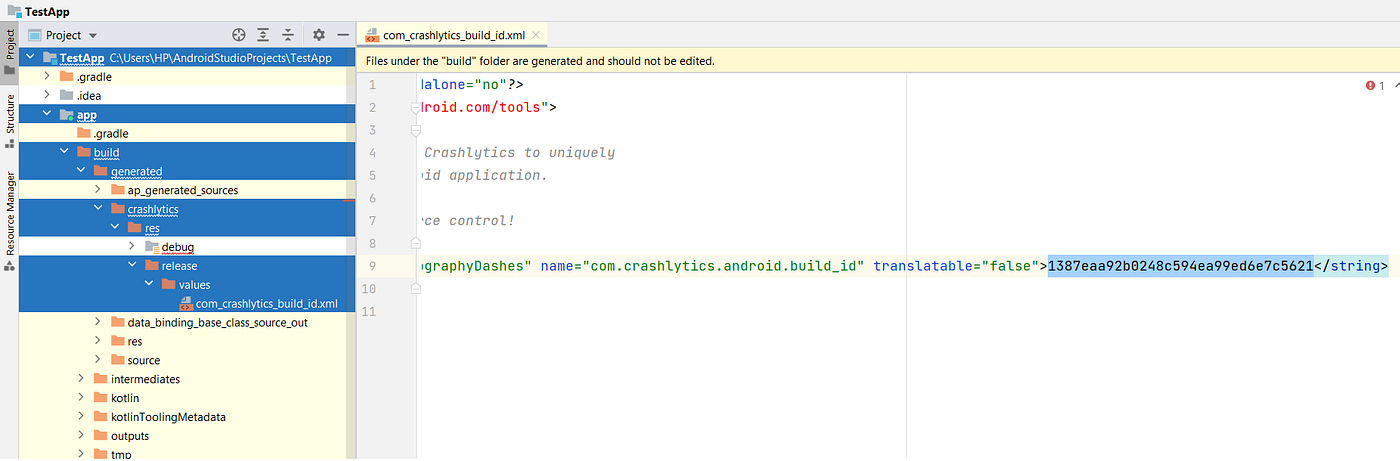
- mappingFileId — It's a 32 digit UUID that volition be obtained from the com_crashlytics_build_id . xml file present in the "/app/build/generated/crashlytics/res/{buildVariant}/values" path every bit you tin see in the screenshot below —
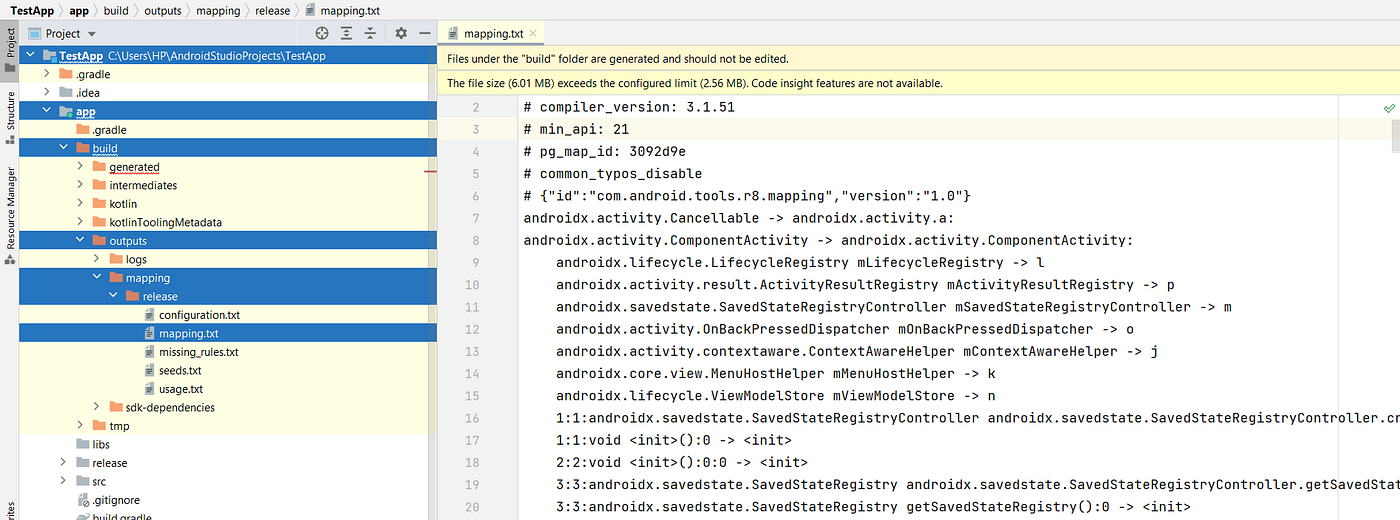
- path_to_mapping_file —It is the accented path of the already generated mapping file which is present in "/app/build/outputs/mapping/{buildVariant}/mapping.txt" path as y'all can meet in the screenshot below —
- path_to_resource_root — For this, you will need to create a file named 'values.xml' and put that in the 'values' named folder, and use the absolute path of the parent directory of the values folder. For example — If path to the values.xml is "C:\\Users\\HP\\Downloads\\values\\values.xml" then 'path_to_resource_root' will exist "C:\\Users\\HP\\Downloads". Content for the values.xml file is shown below —
          <?xml version="ane.0" encoding="utf-8"?>
<resources>
            <string name="google_app_id" translatable="false">                          mobilesdk_app_id                          </string>
</resources>
Step — 5
The last step is to execute the customized task that you have specified in your project-level build.gradle earlier, using the terminal in android studio every bit follows —
gradlew uploadCrashlyticsMappingFileRelease Look for the task execution to get completed and you are practiced to go now.
Thanks for reading the article. Permit me know if you face any issues. You tin can connect with me on LinkedIn and Facebook.
Source: https://medium.com/nerd-for-tech/secure-your-firebases-google-services-json-file-in-android-16680f8e5fb4
0 Response to "How to Download Google-services.json File Again"
Post a Comment